Monday, April 21, 2014

Felt Pinwheel Hair Clips

 Happy Spring! 

I think Pinwheels are one of the easiest and cutest ways to add a little Spring embellishment.  

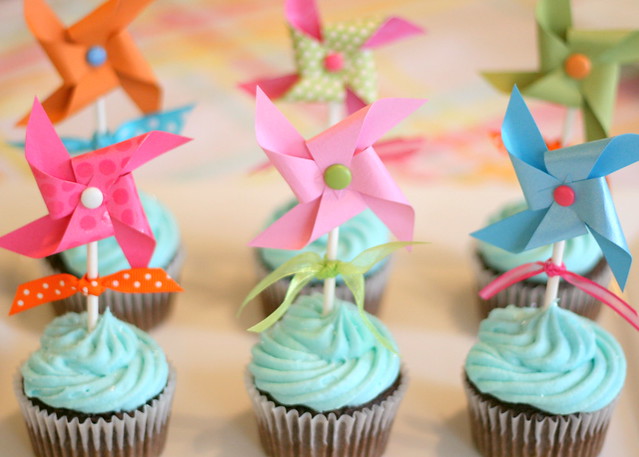
I have used them on Cards, as Outdoor decoration and as Cupcake Toppers.

Pinwheel Cupcakes
(read more about this Birthday Celebration here)

Instead of making them out of Paper, this time I made these sweet little Pinwheels from Felt.

Each one is uses two layers of felt cut into 2" squares.


I chose the Felt Color to coordinate with some pretty spring ribbons.


Once the felt pieces are cut into squares - use sharp scissors to cut half way into the center from each corner.


Be careful not to cut too close to the center, just enough to allow the corners to be folded in to make the pinwheel.


Fold in each corner of the pinwheel points and stitch them in place at the center.


This is an easy sewing job.  You could also use glue hold them in place, but because the points are so tiny, it's actually easier to sew them together (the glue added too much bulk).


Next I covered metal alligator clips with the colorful ribbons using hot glue.  They look pretty cute just as they are....but will be even cuter with the addition of the pinwheels.


 The center of each pinwheel got a coordinating button (hot glued in place).
 

The extra dab of glue holding the button in place, also keeps the sewn points secure.  Sometimes the felt can shred if sewn too close to the point.  The glue ensures everything stays put. 
 

Once the pinwheels are glued to the ribbon covered clips - you almost don't see the ribbon, but it makes a nice finishing touch to have the ribbon pattern peeking out from behind.
You can see more of my Project Thursday Tutorials over at 


Also Linking Up at these crafty sites:


Friday, April 11, 2014

Ten on Ten: April 2014

I'm enjoying finding the beauty and happiness around our every day life.  

You can read more about this project here.


Cutting and Sewing Today


Morning Squeeze


Bowl of Scrabble Tiles {we leave notes to eachother}


My Mama is a Quilt Making Machine - and I now have a place to display them


A Bit of Family History 
{vintage phone used by my parents at their small business} 


The Lilac Lounge


View from Upstairs


Peeps are In The House


Homework Time


I didn't get the final pic of the day = Dinner - but it was a delicious meal of Asian pork and tofu with cabbage and bamboo sprouts (trust me - it looked fantastic and tasted the same)

Can't wait to see what you all have been up to today.  


Thursday, April 3, 2014

Project Life: Week 8

Another Week documented using Becky Higgins Project Life.
 

All the cards and most of the embellishments are from the Studio Calico Monthly Project Life subscription kit.  

  
Title Card.  

I'm loving all the enamel dots that have been in the kits lately.  They are replacing my former addiction to buttons.  

Have you seen how people are making their own dots now?  Time to break out the Pony Beads and Perler Beads and give it a try.  More on that later. 


Left Side Page.  

Incorporating pictures from my iPhone, DSLR and Little K's iPad this week. 


Right Side Page - using Design G.  

It's smaller than the rest of the 12 X 12 pages - and would probably work better as an insert - but it was the perfect ratio of Horizontal to Vertical slots for my needs. 


There is a Pull Out Tab under the Glow Bowling Picture.


With a copy of our Bowling Scores.  I remember once - a long time ago - that I used to be a Good Bowler.  Not so much anymore - but we had a lot of fun.  I blame it on the Lights. 

Tuesday, April 1, 2014

Project Life: Week 7

I finished this weekly spread of Project Life only a few weeks ago, and already I have forgotten some of the sweet events of our daily life.  

Spending a little time reminiscing as I photograph and post about the past few weeks.


Since it was the week of Valentines Day - the color theme had to include Red.

I always start out by printing the photos I want to include - and take my clue from the colors in the pictures.  

Then I sort through my cards and choose ones that work well with the colors in my photos.  


Close Up of Left Hand Side.  

Even though the main colors this week were Red and Black - I didn't want to limit myself.  This is real life, and life is colorful.  So I include photos with all kinds of colors - even if they were not a perfect match. 


I participated in the Monthly Photo Challenge Ten on Ten - and created a collage incorporating my photos from throughout the day into one 4 X 6 photo (I didn't manage to get all 10 photos taken - that's why there are only 8 pictures in the collage).


I used a little selective coloring to highlight the color of the Rose in this tiny picture.  I fussy cut the edges of the ticket and slipped the photo underneath.  


The title card is made from simple black card stock with other elements layered on top.  

Even though the format of the title cards change each week - I almost always include the same details:

 - Week Number (using dimensional stickers)
 - Month
 - Date Stamp with week dates (I am documenting my weeks as Monday through Sunday)


Close Up of Right Hand Side. 

Cards used this week are all from the Studio Calico Project Life Monthly kit - with a few embellishments from my stash.