
There are some really adorable Valentine Cards available in the stores, but I just can't help myself. Valentines Day is another excuse to get out the crafting supplies.
I think original credit for this idea goes to Martha Stewart - but I saw it here - and knew it was perfect for Little K to make as Valentines for her 3rd Grade Class.
I think original credit for this idea goes to Martha Stewart - but I saw it here - and knew it was perfect for Little K to make as Valentines for her 3rd Grade Class.

We were making 33 Fortune Cookies, so I purchased a total of 6 sheets of Craft Foam (2 each of white, pink and red). That gave me enough for the cookies we needed, as well as some "mistakes". I read that Martha's original version was made with Felt, but in this case, I think the craft foam is better for holding shape.

Draw and cut 4 inch circles out of craft foam. We traced a large 29 oz. tomato can, but you could just as easily use a die cut. If you are cutting by hand, be sure to cut just inside your marked line (you don't want any of the pen mark to show after cutting).
Cut assorted ribbon (to match the foam colors) slightly shorter than the diameter of the foam circles (in this case, a little less than 4 inches). Grosgrain ribbon - 3/8 inch wide - works best. Light colored or sheer ribbons don't hide the glue or wire as well (we learned that the hard way).
Cut pieces of 19 gauge wire slightly shorter than the length of the ribbons (in this case, approx 3 3/4 inches). Straighten the cut wire pieces until they are flat.
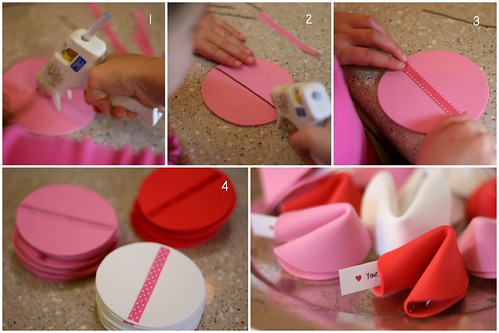
Now for the fun part. Assembly. This was the first time Little K has used a glue gun. It was a bit difficult for her to control the amount of glue - so some of the ribbons were a little gobby, but once they are folded into the cookie shape, you can hardly notice.
1) Place a thin bead of hot glue across the center (diameter) of the foam circle. (I lightly drew a line down the center to make it easier for Little K to follow).
2) Carefully place the wire on top of the glue, and add another bead of hot glue along the wire.
3) Quickly add the ribbon - pressing down with your fingers to secure the wire and ribbon to the foam circle.
4) You will end up with these cute little decorated rounds all ready to be formed into foam fortune cookies.
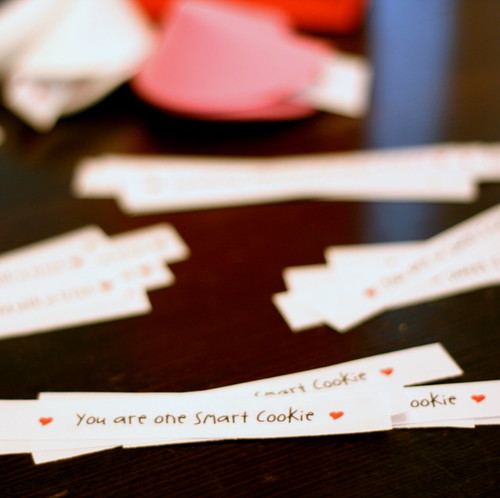
We printed assorted fortunes on the computer, cut them into strips to be inserted in the cookie.
- You are One Smart Cookie - Something Tasty will Come your Way -
- Your Good Deed will be Rewarded with a Treat - Something Delicious is in your Future -
- You are a Sweet Friend to Me -
Once the fortune strip is placed on the foam circle - fold it in half, and press in with your finger along the wired edge to form the fortune cookie shape. The wire keeps the cookie closed, but also allows it to be opened and closed over and over and still keep it's shape.
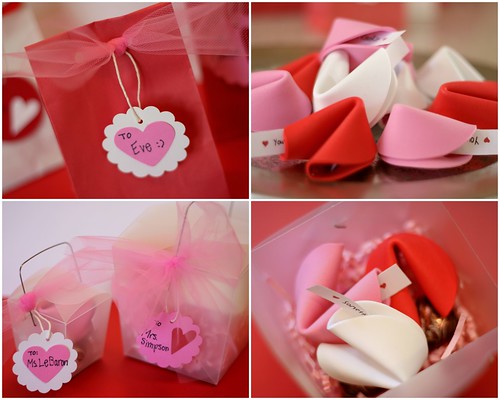
If the fortune cookie is large enough - you can even place small candy treats inside before they are folded. Ours were pretty close to actual size, so we added a few Chocolate Bliss candies (I found a heart shaped version) to the containers.
Teachers will get theirs in cute little velum take out containers with clorful paper shred. The rest of the class will receive colored paper bags decorated with punched name tags and ribbons.

Little K had a lot of fun choosing just the right fortune for each of her class mates.
Now, she not only knows how to use a glue gun, but wire cutters as well. Watch out world...there will be no stopping my little Craft Diva now.
Now, she not only knows how to use a glue gun, but wire cutters as well. Watch out world...there will be no stopping my little Craft Diva now.
Oh my goodness! Those are gorgeous!
ReplyDeletethese are SO cool! little k's school friends must really look forward to holidays, and seeing what she (and her cool crafty mom) will come up with! :-)
ReplyDeleteMy head is going to explode from all the cuteness Karina! There are amazing!!!!! So cute and I love how you packaged them up. I wish I was in her class!
ReplyDeletethis looks so pretty and fun, not to mention no burnt finger tips too! tks for sharing.
ReplyDeleteOh my goodness, those fortune cookie valentines are PERFECT! I'm totally going to make them next year...
ReplyDeleteOH MY! I am going to try these some day...for something! These are so cool, Karina. Love it!
ReplyDeletethis is the cutest idea ever! i'll be using this idea when my daughter starts school. thanks!
ReplyDeletethis is a super idead and just what I was looking for. We will try this craft in our summer Vacation Bible School. Thanks!
ReplyDelete