Showing posts with label Scrappin' Stuff. Show all posts

Friday, June 12, 2015

My Creative Space

I love seeing where other crafters create.  What their crafty spaces look like, and how they keep organized.

Now it's my turn to share my Craft Studio. 

Each of the Design Team members at The Pink Elephant Blog is showing what their creative spaces look like  There are some wonderful organization and storage ideas to be found - go take a look

I have a dedicated room (I know - I'm a lucky girl) that is in the basement so it stays cool in the summer (the temperature here in California is currently 100+ degrees), and also warm in the winter.  

But unfortunately, it also gets very little natural light, which was apparent as I tried to take pictures and found it hard to capture the true colors.  I guess it's time to call the electrician and get those recessed lights installed.

The room has a counter height island table in the center - under the chandelier - with storage on each of the surrounding walls. 
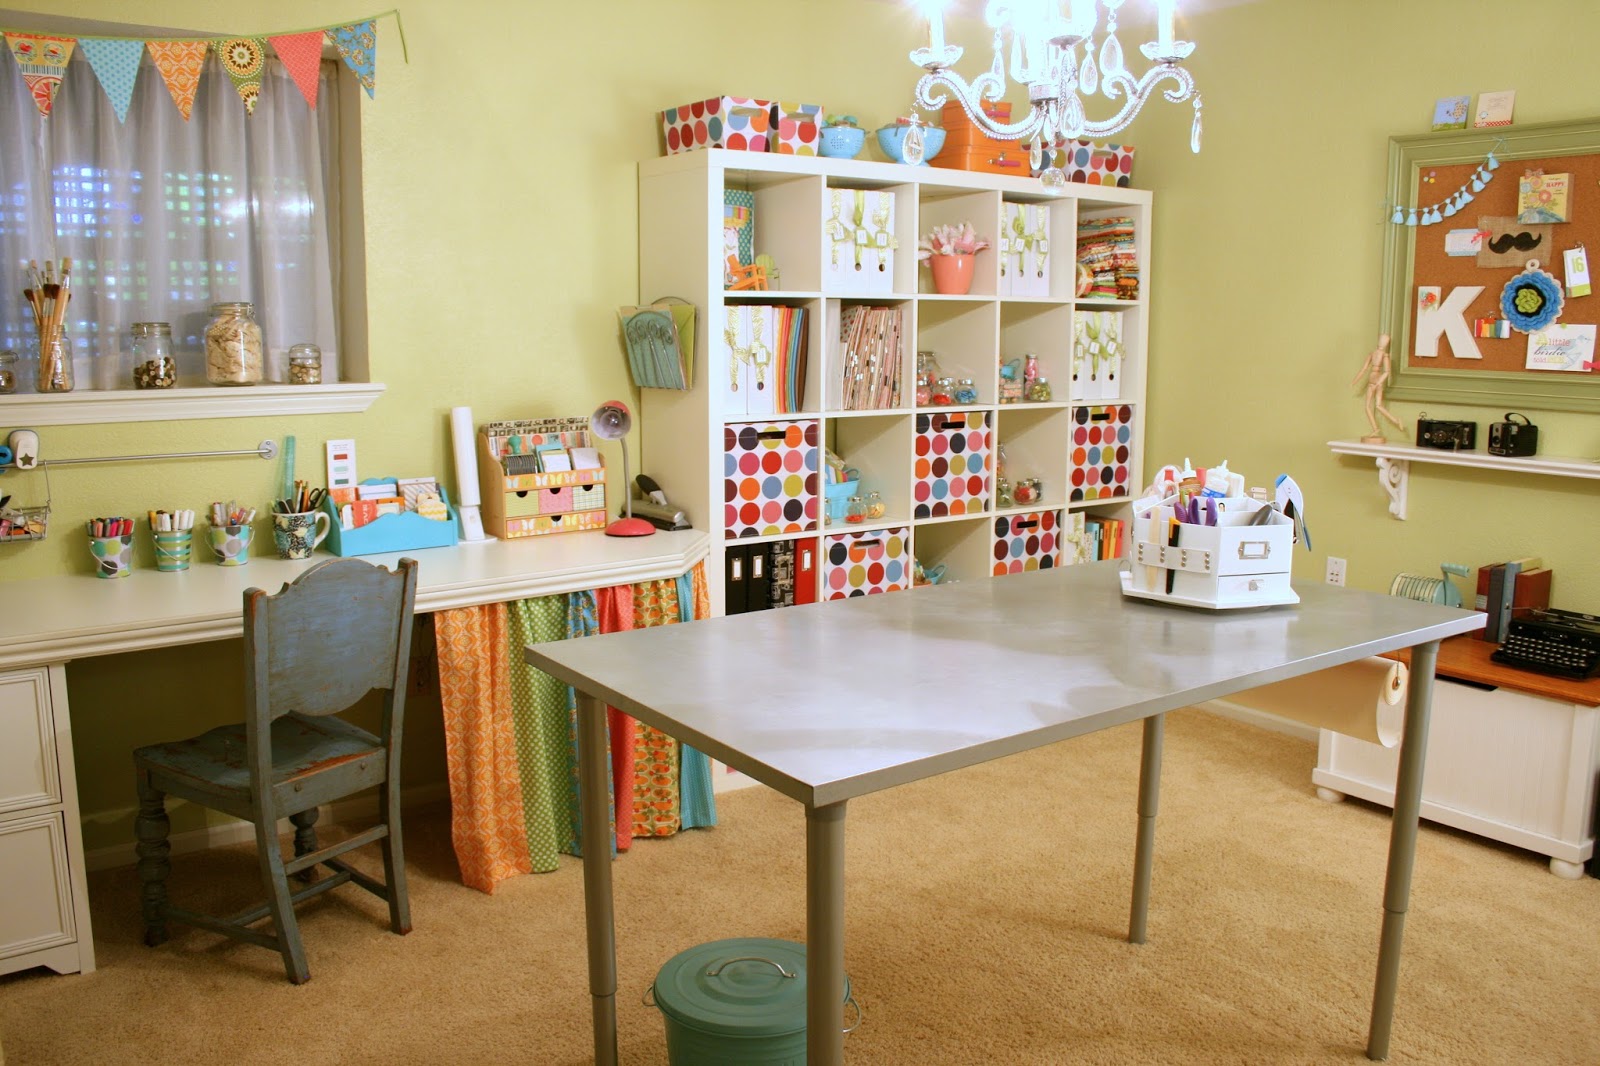

At the end of the table I installed a hanging paper roll.  I don't worry too much about getting paint or ink on the table top because I like that used/distressed look.  But it's nice to have at my fingertips for those super messy projects.


Continuing around the room, i have a large framed cork board filled with different bits and pieces that make me happy.  Part inspiration.  Part storage.  Part organization.


I change it up for the seasons, or whenever a whim moves me.


Underneath I have some vintage cameras - and other vintage office equipment sitting on a toy chest made by my dad (originally made for my now-teenage daughter).  That's where I store unfinished projects.


This room originally had no closets, and was used by the previous owners as a Media Room. 
That should have been my fist clue that the lighting wasn't going to be good. 

We built out closets along one entire wall, but left a little corner nook. 


I wanted to have a separate writing area with open shelves that hold note cards and pretty bowls of paper clips and push pins.  


the closet doors keep everything hidden inside.  But also open up completely flush against the wall, so as I'm working at the island, I can have all the supplies  inside readily accessible.  
 

One side holds mostly fabrics and sewing notions. 


The other side has all my crafting and scrapbook supplies.


My husband and I made hanging frames to hold spools of ribbons (just one of my collecting obsessions).  Nothing makes me happier than having a rainbow of ribbon at my fingertips.


The left side wall is where my sewing machine sits.  

The wooden sewing cabinet was given to me by my mother when I moved into my first apartment.  It's the machine I learned to sew on as a teenager.  I now use a new sewing machine, but the old one is still in the cabinet (someday I'll get around to getting it working again). 


An old kitchen cabinet above my sewing machine stores various notebooks in the plate rack slots (another of my collecting obsessions), and bakers twine in glass sugar shakers. 


My mom (the quilter) made this cute dust cover for my sewing machine.  it's the perfect touch of color to brighten up the well-used wood cabinet.  


On the other long wall, we created a workspace from a piece of white laminated wood.  It's supported by two file cabinets on one end, and attached to a cube storage unit on the other end.  A little painted wood trim to finish the cut edges and it looks like a custom built-in. 


I use a mixture of vintage and new glass jars for storage.  The window ledge above my work desk has jars filled with buttons, ribbons, brushes and twine in neutral shades of cream & white.


I store my punches on towel bars mounted to the wall.  it worked well for me as I don't have a huge collection of punches, but I'm quickly outgrowing this storage method.  


The bottom of my workspace used to be completely open, but I recently added these colorful curtains.  Not only do they match the sewing machine cover, and window swag - but they also hide some not-so-pretty plastic mismatched storage bins. 


As we finish the tour around my craft studio - the last stop is a close up look of the cube storage unit.  


I keep my washi tape organized by color in kitchen colanders sitting on top of the unit. 


More collected items - like vintage handkerchiefs and spools of thread - are displayed in the cubbies. 


Some of my favorite fabrics are tucked into metal bins.  Buttons and flowers in glass jars are spread out throughout the cubbies as colorful accents - but still easy to get.  


A little satin ribbon and tags give plain white magazine boxes some pizazz, and remind me of what's inside.  

Thanks for coming along on this tour of my crafty space.  
It makes me happy and inspires me to create.

I hope your space does the same for you. 


Tuesday, April 1, 2014

Project Life: Week 7

I finished this weekly spread of Project Life only a few weeks ago, and already I have forgotten some of the sweet events of our daily life.  

Spending a little time reminiscing as I photograph and post about the past few weeks.


Since it was the week of Valentines Day - the color theme had to include Red.

I always start out by printing the photos I want to include - and take my clue from the colors in the pictures.  

Then I sort through my cards and choose ones that work well with the colors in my photos.  


Close Up of Left Hand Side.  

Even though the main colors this week were Red and Black - I didn't want to limit myself.  This is real life, and life is colorful.  So I include photos with all kinds of colors - even if they were not a perfect match. 


I participated in the Monthly Photo Challenge Ten on Ten - and created a collage incorporating my photos from throughout the day into one 4 X 6 photo (I didn't manage to get all 10 photos taken - that's why there are only 8 pictures in the collage).


I used a little selective coloring to highlight the color of the Rose in this tiny picture.  I fussy cut the edges of the ticket and slipped the photo underneath.  


The title card is made from simple black card stock with other elements layered on top.  

Even though the format of the title cards change each week - I almost always include the same details:

 - Week Number (using dimensional stickers)
 - Month
 - Date Stamp with week dates (I am documenting my weeks as Monday through Sunday)


Close Up of Right Hand Side. 

Cards used this week are all from the Studio Calico Project Life Monthly kit - with a few embellishments from my stash.  

Monday, February 24, 2014

Project Life: Week 6

All of the cards for this weeks layout are from the New Becky Higgins Themed Cards Planner pack.


The bright colors make me happy.  This pack has design details including push pins and paper clips (since it's Planner themed) - but it's also just a sweet combination of happy elements that seem to work with many of my photos.  My favorite are the cloud cards.  


Close Up of the Left Hand Page.  All the journaling was by hand this week.  I usually like to include mostly printed journal cards (since I'm not a big fan of my handwriting), but that takes a little more time.  Writing by hand was the best choice this week.  


I don't like when I have to use a vertical Title Card. Not sure why I'm stuck on the Title always being in that upper left place.  I've seen plenty of layouts that look great with different title card placements - something about me needs some consistency throughout the album.  Especially since I'm not using one single core kit for the entire year.  

I made the calendar card using the Free - fully customizable tools at this cool site = Time and Date .  Since I do my weeks beginning on Monday - it's often hard to find an annual calendar set up the way I like.  I even made my own weekly check sheet using their tools.  


Some of the embellishments are from the Studio Calico January PL Kit, like the green star clip.  

I love to include memorabilia in our Project Life albums, but try to limit them to small/thin things.  After my first year where I included everything from food packets to pencils, I've learned to keep it simple so the albums don't "explode".  Ticket Stubs are a perfect simple addition. 

Close Up of the Right Hand Side.  

Don't freak out over the picture of my Mum's Eye.  It's showing the stitches from her recent Cornea Transplant (look close in the outside corner of her iris and you can see them).  

Wednesday, February 19, 2014

Project Life : Week 5

Keeping it Current.  I've had this week completed for awhile, but just not posted.

All of the cards and embellishments (I only used a few) are from the Studio Calico Project Life monthly subscription kit. 

LOVE these cute "location" shaped numbers.  

Close Up of the Left Hand Side.  Weather has been a big thing around these parts (we are experiencing a terrible drought so even a few rain drops is Project Life worthy). 

Remember when I talked about using that cool Flip Pocket last week?  And how I should have adhered it to a picture instead of to the pocket (you can read about it here).

This is what I mean (see up there by the yellow arrow).  Even though the added flip pocket is transparent - you can still see where it is attached.  If I was thinking ahead - I would have attached last weeks flip pocket to the back of this weeks picture.  

Close Up of the Right Hand Side.


It was a busy week.  I included 2 inserts.  Each one was 6 X 12.  I was able to keep the color theme of Blue and Orange throughout the inserts as well (that was a total accident). 

Each insert has a little punched tab attached to the pocket page protector.

The second insert - also 6 X 12 was a pocketed insert.  I love it when the colors come together.  

Getting ready to post about Week 6. 
Moving right along - how about you?

Thursday, February 13, 2014

Foxy Valentine

A friend asked me if I had any ideas for a cute Fox inspired Valentine.  

The truth is, I was kind of begging for someone to ask me for help, since little K and I no longer make class valentines (Elementary School parties were the best).

I came up with this Pink Foxy Valentine Treat Bag.


It is made from cardstock cut out pieces (I used several colors of pink plus white), and a poly bag secured inside to hold a sweet treat.


She has a dimensional tail attached to back, a pretty pink bow by her ear, and black sparkle beady little eyes.
 

We filled her belly with marshmallows.


You can download the FREE Foxy Valentine pattern here

I would love to see your version of this Foxy Valentine, so be sure to share in the comments below.   


Friday, January 17, 2014

Valentine Card Round-Up

... "Now that Little K is in Middle School" ...

I seem to say that a lot these days.  It's true - they really do grow up so fast.

Most times I'm excited to see how she has matured into a beautiful and kind young girl who is confident and independent.

Other times - I miss some of the Good Old Times from when she was in Elementary School.

One of those times is Now - around Valentines Day.

We LOVED making Class Valentines Together.

Here is a Round Up of some of our favorites we made in Past Years:
(click on the links below each picture for details)


If you have kids in Elementary School - it's time to start thinking about making those Valentine Cards.  Hope these ideas spark something creative in you.

If Not - I am always happy to consult.  I've got dozens of Kid Valentine Card Ideas that I'll probably never get to make.

In Middle School - they send each other flowers - Aaargh.  
It's way too soon for that.