Showing posts with label Gardening. Show all posts

Thursday, January 20, 2011

Rescued Bulbs

I have these sweet little bulbs popping up all over my back yard.

Sprouting Bulbs

Poor little things have been chopped down by the lawn mower over and over again.

Bulbs in the Yard

Their tiny little tops being cut off just when they think it's safe to peek out of the ground.

So today I rescued them. Dug them up from the yard.

I have no idea what they are:
Daffodils?
Narcissus?
Paper Whites?

New Home

With any luck - we'll find out soon enough.

Rescued

They have been propped up in a pretty glass bowl, filled with pebbles and water and now sit by my kitchen window ready to drink up the sunshine.

Roots

I hope those little roots stretch their legs - right now they look pretty cramped and uncomfortable.

Transplant

There are plenty more. These will be transplanted elsewhere in the yard. Somewhere safe from the lawnmower.

Garden Bench

Next time - remind me that I have a perfectly good potting bench where these sorts of gardening adventures should take place instead of in the kitchen.

Better go mop up the muddy floor.

It's beginning to feel like Spring - at least today.

Monday, February 8, 2010

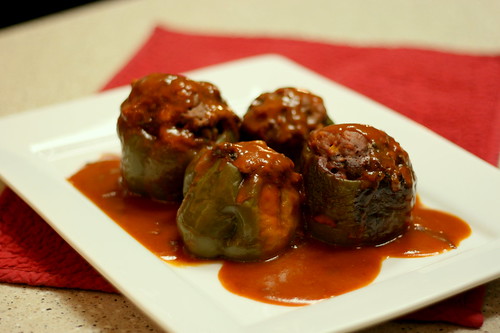
Crock Pot Stuffed Peppers

I've been using my trusty Crock Pot a lot lately. I love coming home to a house that smells like home cooking, but I have to admit, all my slow cooker recipes seem to fall into one of two categories:

Some kind of Meat Stew
OR
Chicken in a "cream of soup" Sauce

There are hundreds of variations on these same basic recipes, and I love them all....but was looking for something different that didn't seem like it was cooked in the Crock Pot.

April to the rescue. My friend (April) sent me this recipe for Stuffed Peppers. It just so happened that I had peppers growing in the garden (yep - we can do that here in Arizona in the winter).


They are green bell peppers, but I kept them on the plant extra long and some ripened to this lovely orange shade. Aren't they pretty.


After a few hours in the Crock Pot, stuffed with ground meat and seasoning - they came out looking like I had slaved in the kitchen.

I'm actually not a fan of peppers (I think it's a texture thing), but my husband likes them - so this dinner was really for him. I'll admit, I didn't eat the pepper shell, but the inside meat stuffing was delicious, and tasted wonderful with the flavoring from being cooked in the pepper. I served it with mashed potatoes (all the better to sop up that yummy tomato gravy).


SLOW COOKER STUFFED PEPPERS

5 Bell Peppers
1/2 lb Lean Ground Beef
1 Packet Dry Soup/Seasoning Mix (Onion or any flavor of choice)
1 11 0z Can Whole Corn (drained)
1 T Worcestershire Sauce
1 T Prepared Mustard
2 10 3/4 oz Cans Condensed Tomato Soup

Slice tops off each pepper. Remove and discard core, seeds and membrane. In a bowl, combine beef, dry seasoning mix and corn. Spoon mixture into prepared peppers. Stand peppers up in slow cooker. Combine Worcestershire sauce, mustard and undiluted canned soup. Pour over peppers. cover and cook on low for 7-8 hours or until peppers are tender.

Note: Too much fat in the ground beef and it will pool in the bottom of the pepper - so lean is best. Don't be afraid to try unusual seasoning mixes. I was out of onion, and used a spinach dip that was delicious.

Thursday, July 2, 2009

Backyard Retreat

This is where we will be spending the weekend. Relaxing by the pool.

That's one of our Orange trees gently cascading over the edge of the wall. There is a Bougainvillea planted directly beneath the Orange tree on the other side of the wall. Not the ideal spot for a plant that requires a lot of sun to bloom, but it was there when we bought the house and I just never did anything with it. Although it never bloomed, or got very big, the leaves were always nice and green (which you come to appreciate when you live in a desert climate).

When I began pruning this spring, I noticed that a few of the Bougainvillea branches were growing up into the Orange tree. I decided to leave them to see what would happen. Once the branches reached the sun, they began to bloom and grow like crazy, right up through the tree.

Now we get to sit back and just enjoy the view.

Friday, June 19, 2009

Look What's Growing In The Garden


I was going to make Tacos for dinner tonight.

I might have to try something Italian instead?


Friday, April 17, 2009

In The Garden Today

I woke up this morning to the sound of the furnace running. It was 49 degrees outside. Now, I realize that's nothing new to many of you, but in this part of Arizona, we have usually had several days of 100 degrees temps by now. So for us, it was chilly.

For some reason the cooler weather made me appreciate all the things growing in the garden. I know that soon enough, our weather will be hot and scorching again, and the plants need to get a good start now, during this cooler weather, to be strong enough to withstand the summer heat.


I planted some new rose bushes last year. I tried to find places in the yard that received dappled sunlight throughout the day to offer some protection from the heat. I think they are pretty happy. There are several other varieties that have not yet bloomed this spring. I'm thrilled to see these ones doing so well
.

This is the first bud on this rose bush. I can't wait to see in in full bloom - hopefully soon.

This little Herb Garden is just outside my kitchen door. It's perfect for snipping fresh herbs when I'm cooking. Several of the plants (Rosemary, Mint and Sage) were put in last year and wintered over beautifully. I cut the Mint and Sage back completely about 2 months ago, and this is all fresh new growth. The entire planter box is no more than 5' X 3', but it puts out a ton of growth. I'm going to have to find some good recipes for Rosemary...it's starting to take over.


Purple Basil - it's a new planting this year. I just love the color. We sometimes have trouble with dark leafed plants burning because they absorb the heat. I hope it will do OK.

Mint - one of my favorites.

This Basil plant made it through the winter. Cut back in January, the new growth has already started to flower. I think I may let it go to seed and see what I get.

I also have a raised planter in another part of the yard. We built it on a tiled slab where the previous home owners had a hot tub. Several Tomato plants, and some cucumbers that are not doing much, but a few things are already producing well there.

One Green Bell Pepper - hopefully more to come.


Strawberry Plants.

Some with blossoms...

Some with strawberries - ripe - and soon to be ripe.

These beautiful shiny berries are no longer on the bush - I couldn't resist!


We also have a few friends that visit the garden...

Just kidding, he's not real. It's connected to an irrigation line so he fills the birdbath with fresh water each day. My daughter took this photo and I thought it looked pretty convincing.

Friday, April 3, 2009

Fresh Squeezed

We still had lots of oranges left, and the joy was quickly fading, so I took the easy way out. Squeezing and Freezing. Sounds simple enough? Squeeze the juice, pop it in the freezer and it will be there for me later when I have a creative burst that requires oranges.

We’ve been squeezing O.J. since January when they first began to ripen. I have this great little Black & Decker electric juicer that does a terrific job, and in no time flat I can have a pitcher of fresh O.J. Multiply that by 10 times, maybe 20? I lost count. Needless to say, after juicing hundreds of oranges I was sticky, bored and the juicer was beginning to smoke a little (not really).

But I’m happy to say, I have a freezer full of frozen quarts of Fresh Squeezed Orange Juice just waiting for me. I’m sure in a month or two I’ll really appreciate having them there. Right now, I’m kind of glad they are out of sight.

The good news is, I had just enough left over to enjoy one more delicious glassful.

Now, I can’t help thinking... "there has to be something I can make out of all these leftover orange cups?”

Thursday, April 2, 2009

It's Orange Season

We’ve been enjoying the wonderful scent from the Orange Blossoms on our backyard trees for weeks now. The oranges from last year’s blossoms are all ripe, and it’s time to get them picked. So that means – we have been making all things Orange to use up the fruit.
My Mom is in town visiting from Pennsylvania. Years ago she used to do a lot of canning - Tomatoes, zucchini, cucumbers, peppers and lots more. Back then, she canned out of necessity - to keep food costs down by growing her own. This project was mostly for fun. Like so many of my "home made" items, they are seldom cost savers. I had a blast working with Mom and I think she had a bit more fun this time around.
Our first project - Homemade Orange Marmalade.

We picked as many oranges as my well used little garden cart
(a gift from hubby many years ago) could hold.

The smell was amazing as we pulled them from the trees. We live in one of the "Groves" neighborhoods in Mesa, Arizona. The homes are built in an old Citrus Grove. We have 14 orange trees in our yard (which is nothing compared to some of our neighbors). Other homes have lemon and grapefruit trees.

When the oranges are ripe, a crew comes around and gleanes the trees - picking all the fruit from our trees in less than an hour. I can't imagine how long it would have taken for us to do it ourselves. If the fruit isn't picked, it will eventually drop to the ground and attract all sorts of critters...have you ever seen a javelina? 
This is what was left AFTER we picked what we needed.

And so the Marmalade Making began...
Peeled - sectioned - rinds sliced...
After it's all cooked down...


The finished product. Home Made Marmalade.
 
I just love how it looks in these adorable little jars. 
This is the recipe I used. I found it in a publication from UC Davis, along with tons of other useful information on Preserving Oranges.

ORANGE MARMALADE(makes 6 half-pint jars)
4 Medium Oranges
2 Medium Lemons
2 1/2 Cups Water
1/8 Teaspoon Baking Soda
6 1/2 Cups Sugar
1 Package Powdered Pectin
1/4 Teaspoon butter

Sterilize empty canning jars in boiling water, on a rack, for 10 minutes.

Wash citrus fruits. Remove the rinds in quarters. Remove as much of the pith as possible from the inside of the rind quarters. Thinly slice the rinds into strips and place in a large saucepan. Mix the rinds with water and baking soda. Bring to a boil, reduce heat, cover and simmer for 20 minutes, stirring occasionally.

While the rinds are cooking, remove seeds from the peeled citrus segments and finely chop the fruit, saving the juice. Add to the cooked rind mixture. Cover, bring to a boil, reduce heat, and simmer for 10 minutes.

Measure exactly 4 cups of cooked fruit and rind mixture. One box of pectin is sufficient to gel this much liquid, so is important to have the correct amount. Use a slotted spoon to make sure you get all the fruit and rind. Use remaining juice to bring the total volume to 4 cups. Discard any leftover juice, and return the 4 cups of cooked fruit, rind and juice to the saucepan.

Add pectin and butter to the measured fruit, rind and juice. The butter reduces foaming during the cooking process. Bring the mixture to a vigorous boil. Stirring constantly, boil for 1 minute. Add sugar to the mixture. Return to a boil. Stirring constantly, boil for 1 more minute. Remove from heat and let stand for 5 minutes, stirring occasionally.

Prepare 2-piece canning lids according to manufacturer's directions. Ladle hot marmalade into hot, sterile jars, leaving 1/4 inch of headspace. Wipe the jars and rim clean with a towel. Place clean prepared lid on the rim and screw the ring band on finger-tight.

Process in a boiling waterbath canner for 5 minutes. Remove from waterbath and let jars cool, undisturbed for 12-24 hours. When jars are cool to the touch, tighter the ring band completely. You will begin to hear the jars "pop" as the seals cool. Check seals by pressing the middle of the lid with your finger. If the lid springs back, then the jar is not sealed and must be refrigerated.