I love seeing where other crafters create. What their crafty spaces look like, and how they keep organized.
Now it's my turn to share my Craft Studio.
Each of the Design Team members at The Pink Elephant Blog is showing what their creative spaces look like There are some wonderful organization and storage ideas to be found - go take a look.
I have a dedicated room (I know - I'm a lucky girl) that is in the basement so it stays cool in the summer (the temperature here in California is currently 100+ degrees), and also warm in the winter.
But unfortunately, it also gets very little natural light, which was apparent as I tried to take pictures and found it hard to capture the true colors. I guess it's time to call the electrician and get those recessed lights installed.
The room has a counter height island table in the center - under the chandelier - with storage on each of the surrounding walls.
At the end of the table I installed a hanging paper roll. I don't worry too much about getting paint or ink on the table top because I like that used/distressed look. But it's nice to have at my fingertips for those super messy projects.
Continuing around the room, i have a large framed cork board filled with different bits and pieces that make me happy. Part inspiration. Part storage. Part organization.
I change it up for the seasons, or whenever a whim moves me.
Underneath I have some vintage cameras - and other vintage office equipment sitting on a toy chest made by my dad (originally made for my now-teenage daughter). That's where I store unfinished projects.
This room originally had no closets, and was used by the previous owners as a Media Room.
That should have been my fist clue that the lighting wasn't going to be good.
We built out closets along one entire wall, but left a little corner nook.
I wanted to have a separate writing area with open shelves that hold note cards and pretty bowls of paper clips and push pins.
the closet doors keep everything hidden inside. But also open up completely flush against the wall, so as I'm working at the island, I can have all the supplies inside readily accessible.
One side holds mostly fabrics and sewing notions.
The other side has all my crafting and scrapbook supplies.
My husband and I made hanging frames to hold spools of ribbons (just one of my collecting obsessions). Nothing makes me happier than having a rainbow of ribbon at my fingertips.
The left side wall is where my sewing machine sits.
The wooden sewing cabinet was given to me by my mother when I moved into my first apartment. It's the machine I learned to sew on as a teenager. I now use a new sewing machine, but the old one is still in the cabinet (someday I'll get around to getting it working again).
The wooden sewing cabinet was given to me by my mother when I moved into my first apartment. It's the machine I learned to sew on as a teenager. I now use a new sewing machine, but the old one is still in the cabinet (someday I'll get around to getting it working again).
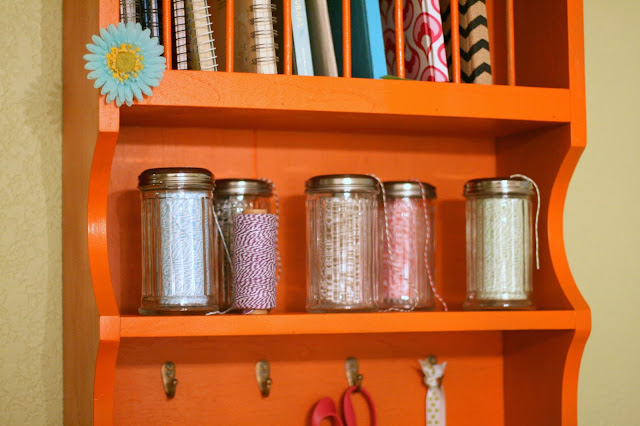
An old kitchen cabinet above my sewing machine stores various notebooks in the plate rack slots (another of my collecting obsessions), and bakers twine in glass sugar shakers.
My mom (the quilter) made this cute dust cover for my sewing machine. it's the perfect touch of color to brighten up the well-used wood cabinet.
On the other long wall, we created a workspace from a piece of white laminated wood. It's supported by two file cabinets on one end, and attached to a cube storage unit on the other end. A little painted wood trim to finish the cut edges and it looks like a custom built-in.
I use a mixture of vintage and new glass jars for storage. The window ledge above my work desk has jars filled with buttons, ribbons, brushes and twine in neutral shades of cream & white.
I store my punches on towel bars mounted to the wall. it worked well for me as I don't have a huge collection of punches, but I'm quickly outgrowing this storage method.
The bottom of my workspace used to be completely open, but I recently added these colorful curtains. Not only do they match the sewing machine cover, and window swag - but they also hide some not-so-pretty plastic mismatched storage bins.
As we finish the tour around my craft studio - the last stop is a close up look of the cube storage unit.
I keep my washi tape organized by color in kitchen colanders sitting on top of the unit.
More collected items - like vintage handkerchiefs and spools of thread - are displayed in the cubbies.
Some of my favorite fabrics are tucked into metal bins. Buttons and flowers in glass jars are spread out throughout the cubbies as colorful accents - but still easy to get.
A little satin ribbon and tags give plain white magazine boxes some pizazz, and remind me of what's inside.
Thanks for coming along on this tour of my crafty space.
It makes me happy and inspires me to create.
I hope your space does the same for you.
It makes me happy and inspires me to create.
I hope your space does the same for you.


